
🎯 Unified Event Management
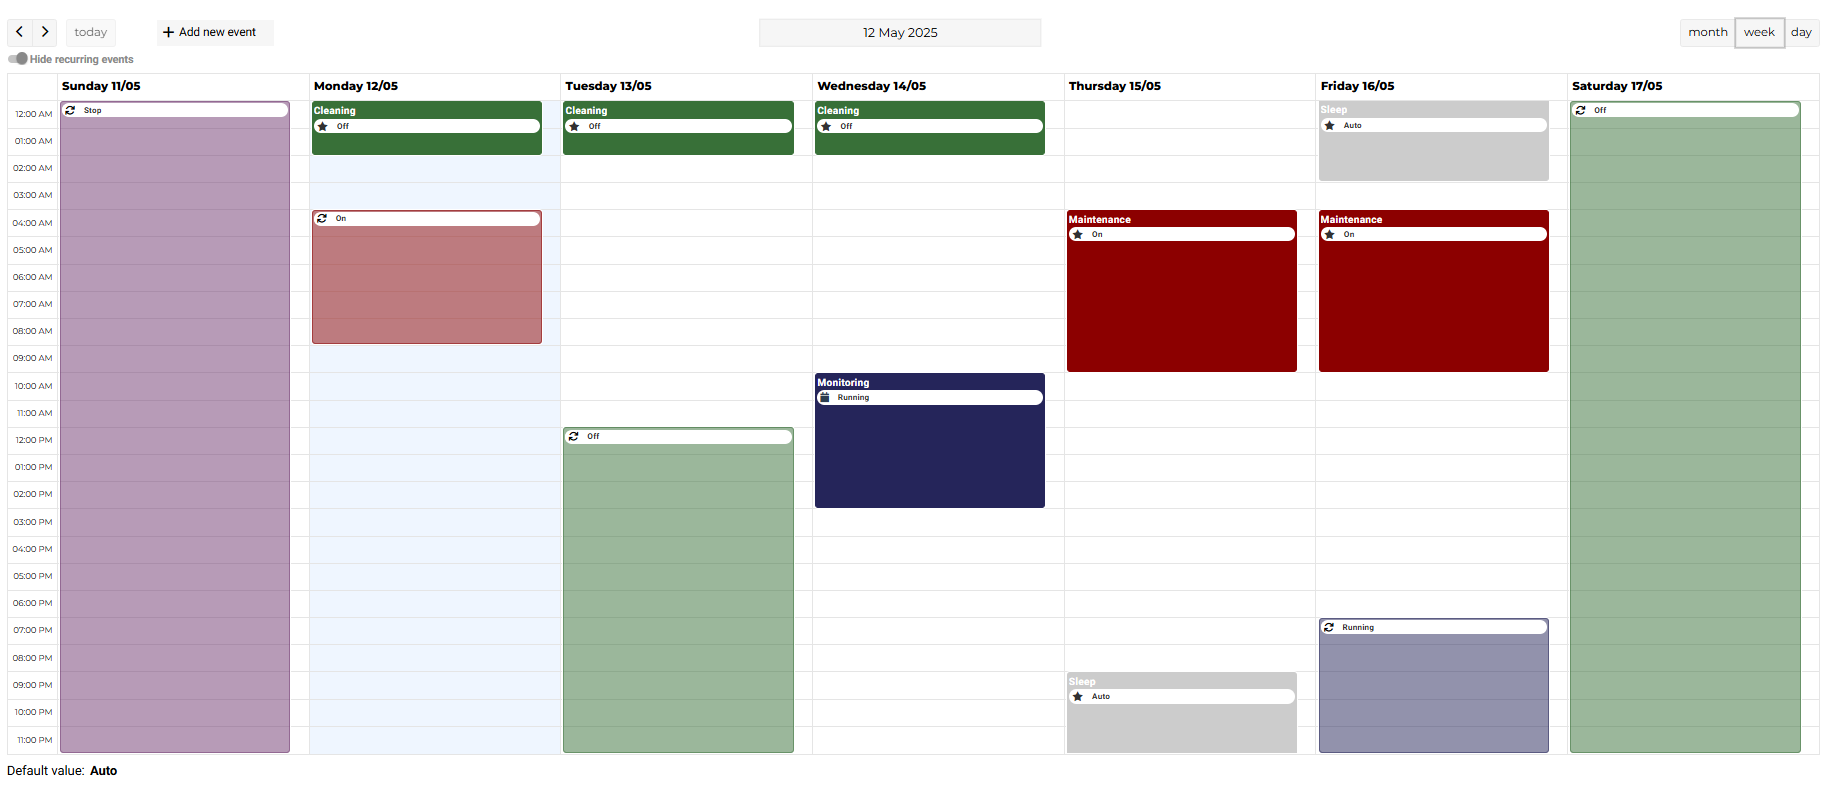
The EnhancedScheduler provides a unified view for managing both recurring and special events. This feature helps users easily distinguish between different types of events and manage their schedules more effectively.
🎨 Event Color Coding
-
Recurring Events: Displayed in lighter colors to indicate their repetitive nature.
-
Special Events: Shown in darker colors to highlight their uniqueness and importance.
In Niagara, each type of schedule is color-coded by default to help users easily distinguish between different types of events. You can find the default color code for Niagara's schedules => HERE
🔖 Icon Definitions
|
|
|---|---|
|
Calendar icon: Reference event |
|
|
Star icon: Special event |
|
|
Recurring icon: Recurring event |
|


⚖️ Priority Handling
Events in the EnhancedScheduler follow a specific priority system:
-
Special Events: Have higher priority over recurring events. If a special event overlaps with a recurring event, the special event will always be placed to the left of the recurring event.
-
Overlapping Special Events: If two special events overlap, priority is given to the event created last.
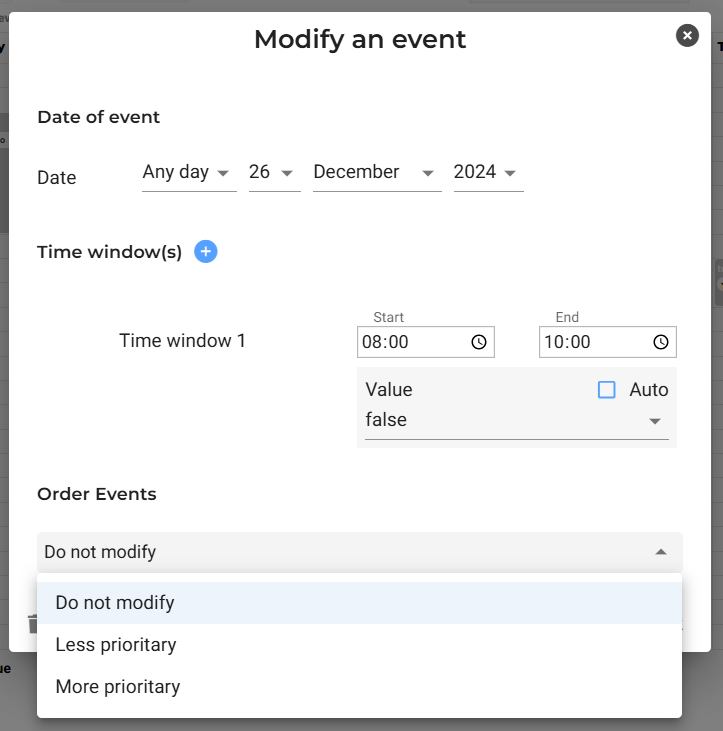
Adjusting Event Priority
The ability to modify the priority of an event is a functionality that already existed in Niagara and is also available in the EnhancedScheduler. This can be done using the "Order Events" dropdown menu when creating or editing an event (see image below). The available options are:
-
Do not modify: Keeps the current priority of the event unchanged.
-
Less priority: Assigns the event the lowest priority.
-
More priority: Assigns the event the highest priority.
This functionality enables users to organize overlapping events effectively by manually defining their importance.
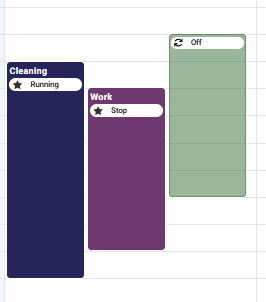
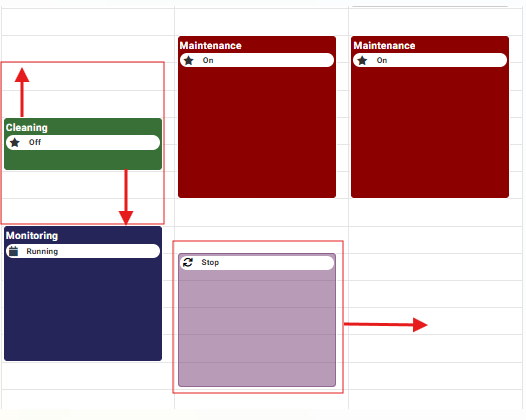
Example:
In the screenshot below, the special event Cleaning has a higher priority than the special event Work, so Cleaning is placed to the far left because it has the highest priority. Additionally, as shown in the screenshot, there is a third event next to the special events. This event will always be on the right because, being a recurring event, it does not have priority over a special event.
✏️ Event Creation/Editing
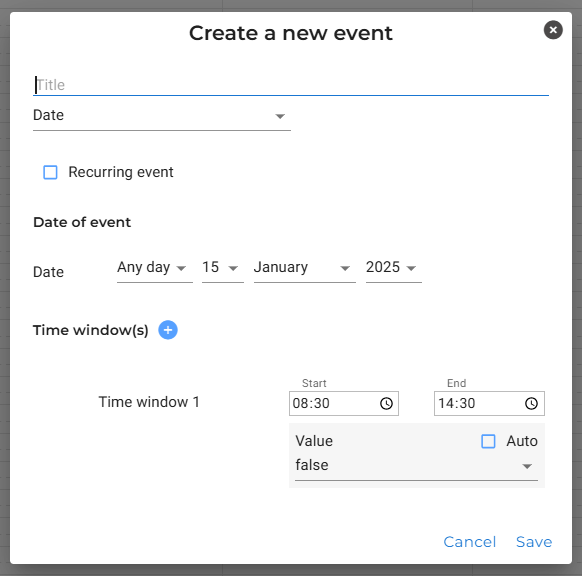
➕ Creating Events
To create a new event, use the "+" button or click directly in the empty field of the EnhancedScheduler.
An intuitive interface opens, allowing you to enter event details:
-
Event Name: Events with the same name can be created
-
Event Type: Date, DateRange, Calendar and MultiDays
-
Date and Time: Choose the start and end dates, as well as specific time windows
🔀 Creating or Editing Multiple Time Windows Simultaneously
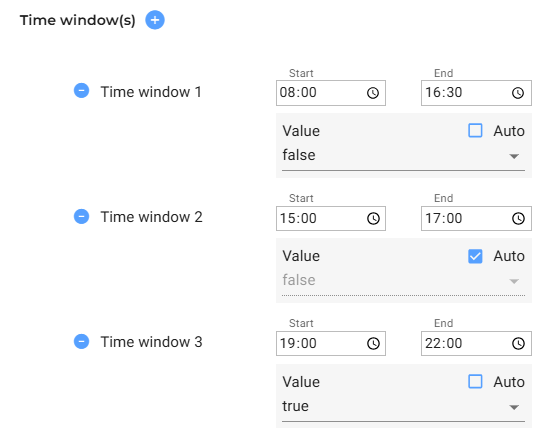
When you click the "+" button, a new time window is added. To remove a time window, click the "-" button.
✏️ Editing an Event
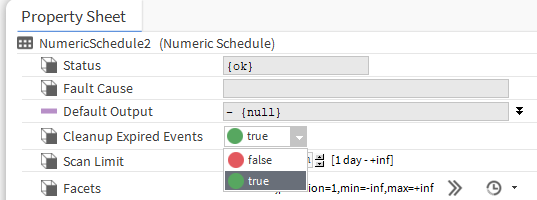
⚙️ Cleanup Expired Events
When the user sets Cleanup ExpiredEvents to true in the AX Property Shoot, attempting to create a special event on a past date will result in an error. Setting it to false will allow the creation of events in the past.
It’s better to let this value set to true : the Cleanup ExpiredEvents feature in Niagara is used to automatically remove events that have already occurred, helping to keep the calendar clean and organized. It saves memory usage too (past events take place in station file)
🗓️ New Event
🗂️ EnhancedScheduler: Recurring and Special Events
With the EnhancedScheduler, you can set up recurring and special events, similar to what was possible with Niagara.
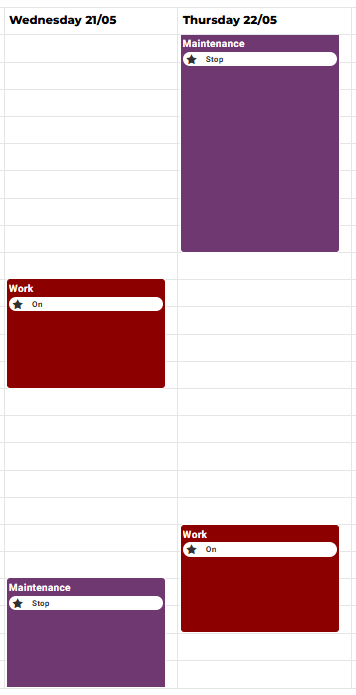
📅 Introduction of "Multi Days" Event Type
The "Multi Days" event type is a key addition in the EnhancedScheduler.
It allows you to schedule events that span across multiple days, a feature that was not available in the previous Niagara system.
⏰ Planning Example
You can now create an event that starts at 20:00 and ends at 08:00 the next day, giving you more flexibility and precision in planning extended activities.
🔖 Creating Events with the Same Name
The EnhancedScheduler also supports the creation of multiple events with the same name. (technically, we manage displayNames on events for you)
This helps structure and manage recurring or related events more easily, without the need to assign a unique name to each one.
📋 Event Variations in EnhancedScheduler
The EnhancedScheduler allows you to create a variety of special events similar to the Niagara system. Below is a table listing all possible combinations of events you can create with our view.
🗓️ “Date” type event combinations
|
Combinaison |
Example |
|---|---|
|
Specific day X of a specific month X of a specific year X. |
January 15, 2024 |
|
Any day of a specific month X of a specific year X. |
Any day of January 2024 |
|
Any day of any month of a specific year X. |
Any day of each month in 2024 |
|
Specific day X of any month of a specific year X. |
15th of any month in 2024 |
|
Specific day X of any month of any year. |
15th of any month, any year |
|
Specific day X of a specific month X of any year. |
January 15 of any year |
|
Any day of any month of any year. |
Any day, any month, any year |
|
Any day of a specific month X of any year. |
Any day of January, any year |
|
Specific weekday X of any day of any month of a specific year X. |
Any Monday of each month in 2024 |
|
Specific weekday X of any day of any month of any year. |
Any Monday of each month, any year |
|
Specific weekday X of any day of a specific month X of any year. |
Any Monday of January, any year |
|
Specific weekday X of any day of a specific month X of a specific year X. |
Any Monday of January 2024 |
|
Specific weekday X of a specific day X of a specific month X of a specific year X. |
Monday, January 15, 2024 |
|
Specific weekday X of a specific day X of any month of any year. |
Monday, 15th of any month, any year |
|
Specific weekday X of a specific day X of a specific month X of any year. |
Monday, January 15 of any year |
🗓️ “Date Range” Type Event Variations
|
Combination |
Example |
|---|---|
|
Specific day X of a specific month Y of a specific year Z to a specific day X of a specific month Y of a specific year Z. |
January 1, 2024 to January 10, 2024 |
|
Specific day X of a specific month Y of a specific year Z to any day of the specific month Y of the specific year Z. |
January 1, 2024 to any day of January 2024 |
|
Any day of the specific month Y of the specific year Z to any day of the specific month Y+1 of the specific year Z. |
Any day of January 2024 to any day of February 2024 |
|
Any day of any month of the specific year Z to a specific day X of a specific month Y of the specific year Z. |
Any day of any month in 2024 to January 15, 2024 |
|
Any day of any month of any year to a specific day X of a specific month Y of any year. |
Any day of any month of any year to January 15 of any year |
|
Any day of any month of any year to December 31 of any year. |
Any day of any month to December 31, any year |
|
Any day of any month of the specific year Z to any day of any month of the specific year Z. |
Any day of any month in 2024 to any day of any month in 2024 |
|
Specific day X and a specific month Y to December 31 of any year. |
January 1 to December 31, any year |
|
Any day of the specific month Y of the specific year Z to a specific day X of the month Y of any year. |
Any day of January 2024 to January 15, any year |
|
Specific day X of any month of any year to a specific day X of any month of any year. |
1st of any month to the 10th of any month |
|
Specific day X of any month of the specific year Z to a specific day X of any month of the specific year Z. |
1st of any month in 2024 to the 10th of any month in 2024 |
|
Specific day X of a specific month Y of the specific year Z to any day of any month of the specific year Z. |
January 1, 2024 to any day of any month in 2024 |
🎨 Default Color Coding in Niagara Schedules
🔲 Boolean Schedule
-
Colors:
-
TRUE: Green (#00FF00) -
FALSE: Red (#FF0000) -
NULL: Gray (#808080)
-
-
Description: Boolean schedules represent events with binary states, such as TRUE/FALSE. The default green color indicates the "TRUE" state, the red color indicates the "FALSE" state, and the gray color indicates the "NULL" state.
🔢 Numeric Schedule
-
Default Color: Purple (#808080)
-
Description: Numeric schedules are used for events that involve numerical values (e.g. temperature settings, light intensity). The default purple color makes these events easily recognizable.
🔠 Enum Schedule
-
Description: Enum schedules represent events with enumerated values, such as modes or levels. The colors are assigned in order of the values defined in the EnumRange configuration.
Default Colors in Niagara:
|
Value |
Color |
Tag |
|---|---|---|
|
0 |
Dark Red (#8C0000) |
darkred |
|
1 |
Dark Green (#387038) |
darkgreen |
|
2 |
Dark Purple (#703870) ⚠️ |
darkpurple |
|
3 |
Dark Blue (#25255A) |
darkblue |
|
4 |
Dark Indigo (#1F6F70) ⚠️ |
darkindigo |
|
5 |
Dark Orange (#704308) |
darkorange |
|
6 |
Gray (#606060) |
gray |
|
7 |
Red (#E17171) |
red |
|
8 |
Green (#65CB65) |
green |
|
9 |
Purple (#CB7FCB) |
purple |
|
10 |
Blue (#6C6CCB) |
blue |
|
11 |
Indigo (#54B7B8) |
indigo |
|
12 |
Orange (#C88435) |
orange |
|
13 |
Khaki (#E1E171) |
khaki |
⚠️ Warning: The colors Dark Purple (#703870) and Dark Indigo (#1F6F70) work correctly as default colors in Niagara but cannot be manually assigned in the colors facet. If you try to use them directly in the facets, they will not be recognized. All other colors can be assigned freely.
These default colors are automatically assigned in Niagara when no specific customization is applied.
Example
If you define an EnumRange like this:
{valueA=0, valueB=1, valueC=2}
Then the colors applied by default will be:
-
valueA=0→ Dark Red (#8C0000) -
valueB=1→ Dark Green (#387038) -
valueC=2→ Dark Purple (#703870)
These default colors are automatically applied by Niagara unless you override them via the colors facet.
🔤 String Schedule
-
Default Color: Gray (#606060)
-
Description: String schedules are used for events that involve textual data. The default gray color allows users to quickly identify these events in the calendar.
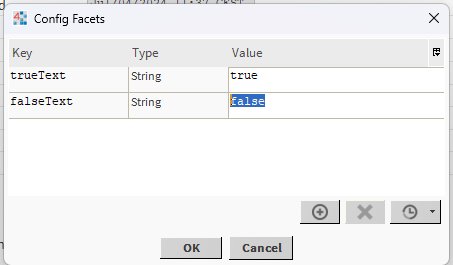
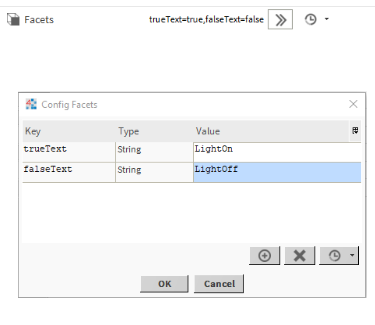
🛠️ Using Default Colors in Facets Configuration
In Niagara, you can assign custom colors to your EnumSchedule values by configuring the Facets.
1️⃣ Understanding the range Key
The range key defines the possible values for an EnumSchedule.
For example, in an EnumSchedule, we may have:
|
Value |
Tag (Name) |
|---|---|
|
0 |
on |
|
1 |
off |
|
2 |
auto_mode |
By defining range={on=0, off=1, auto_mode=2}, we specify that our EnumSchedule can take these three values.
2️⃣ Understanding the colors Key
The colors key allows assigning specific colors to each EnumRange value.
If we use colors={cyan=0, darkgreen=1, gray=2}, this means:
-
on=0will have the color cyan. -
off=1will have the color dark green. -
auto_mode=2will have the color gray.
So when the event is in "on", it will appear cyan in the calendar, and if it is in "auto_mode", it will be gray.
📌 Full Example in Niagara
In the Property Sheet, this would appear as follows:
|
Key |
Type |
Value |
|---|---|---|
|
range |
EnumRange |
|
|
colors |
EnumRange |
|
➡️ Final Result:
-
"on" → Cyan
-
"off" → Dark Green
-
"auto_mode" → Gray
⚠️ Important
✅ Colors can be customized freely, except for two exceptions:
🚨 The colors "Dark Purple" and "Dark Indigo" are not recognized if manually assigned in colors.
These two colors only work when used as Niagara's default colors and cannot be directly specified in the facets configuration.
Conclusion
With Facets, you can:
✔️ Define your own values for an EnumSchedule using range.
✔️ Assign specific colors to each value using colors.
✔️ Modify event appearance in your calendar based on its state.
If no custom colors are assigned, Niagara will automatically apply its default colors.
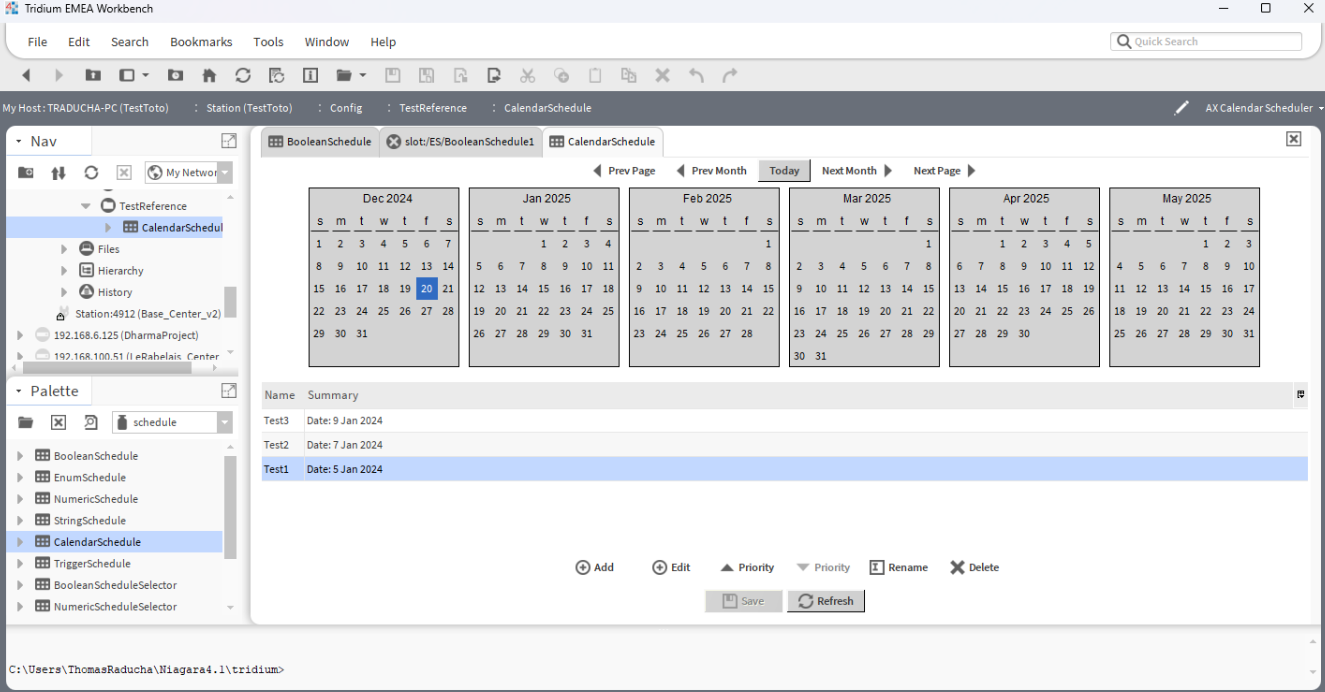
🔗 Reference Events in EnhancedScheduler
In Niagara, creating a Reference Event in a schedule (e.g., Boolean Schedule) essentially involves linking to an event in a CalendarSchedule. This type of event provides dynamic control and flexibility by associating one schedule with another.
🛠️ How Reference Events Work in Niagara
-
Create a CalendarSchedule:
-
Before creating a reference event, you must first create a schedule of type CalendarSchedule.
-
-
Create a Reference Event in Another Schedule:
-
In another schedule (e.g., Boolean Schedule), create a reference event by:
-
Adding one or more time slots to the event.
-
Linking this event to an event in the CalendarSchedule.
-
-
For example:
-
If the CalendarSchedule contains events on January 5st, 7th, and 9th, 2025, the reference event in the Boolean Schedule will automatically inherit these dates when linked.
Reference Events in EnhancedScheduler
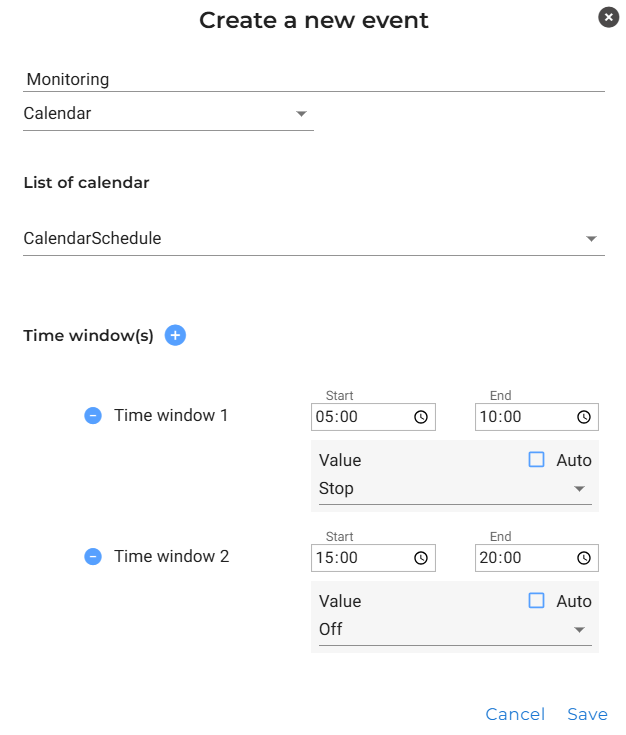
The EnhancedScheduler simplifies the process of creating Reference Events with an intuitive interface:
-
Select the "Calendar" Option:
-
When creating a new event, select "Calendar" from the dropdown menu.
-
-
Choose a CalendarSchedule:
-
A second dropdown will appear, listing all available CalendarSchedules in the station.
-
Select the desired CalendarSchedule to link the reference event.
-
-
Add Time Slots:
-
Define one or more time slots for the reference event. These time slots will dynamically align with the events in the selected CalendarSchedule.
-
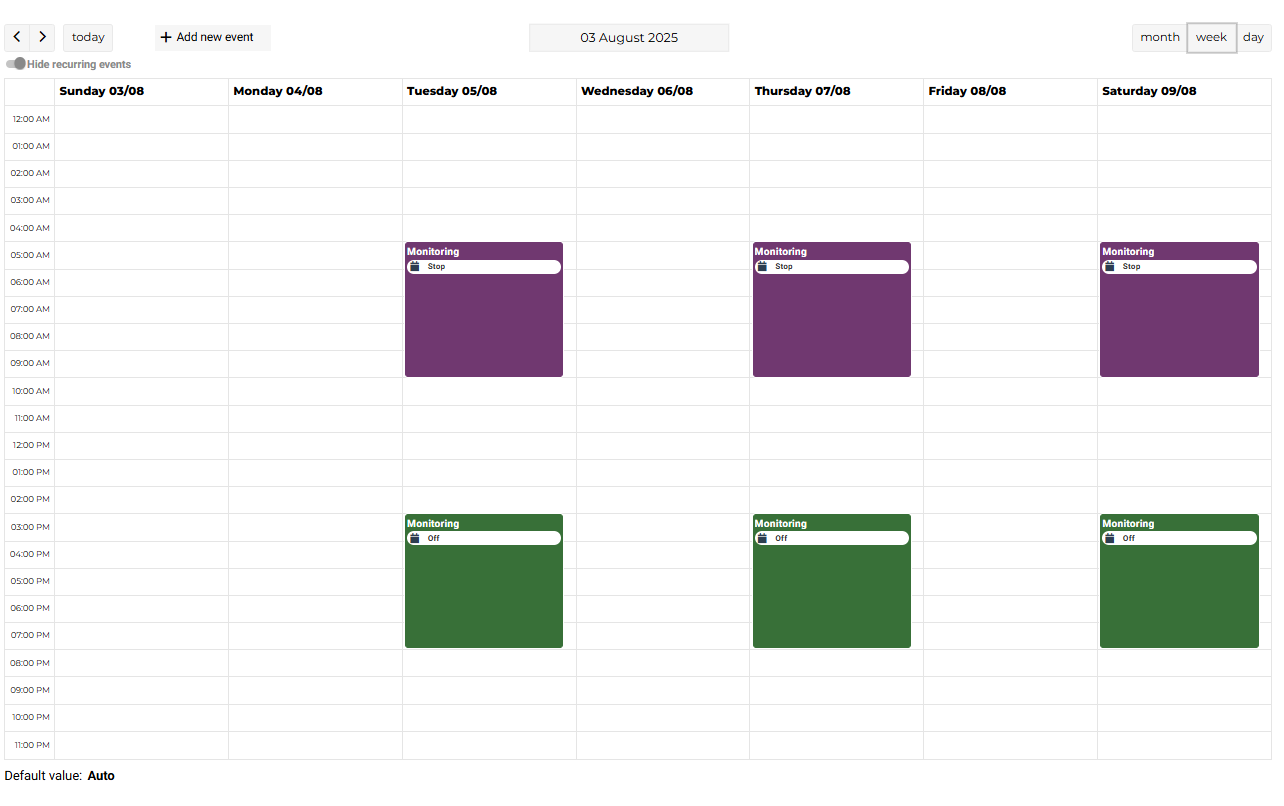
For example:
-
If the CalendarSchedule named "Monitory" has events on August 5st, 7th, and 9th, 2025, any time slots you add to the reference event will automatically link to those dates.
This new functionality in the EnhancedScheduler streamlines the process of creating and managing Reference Events, offering users greater flexibility and control in linking schedules efficiently.
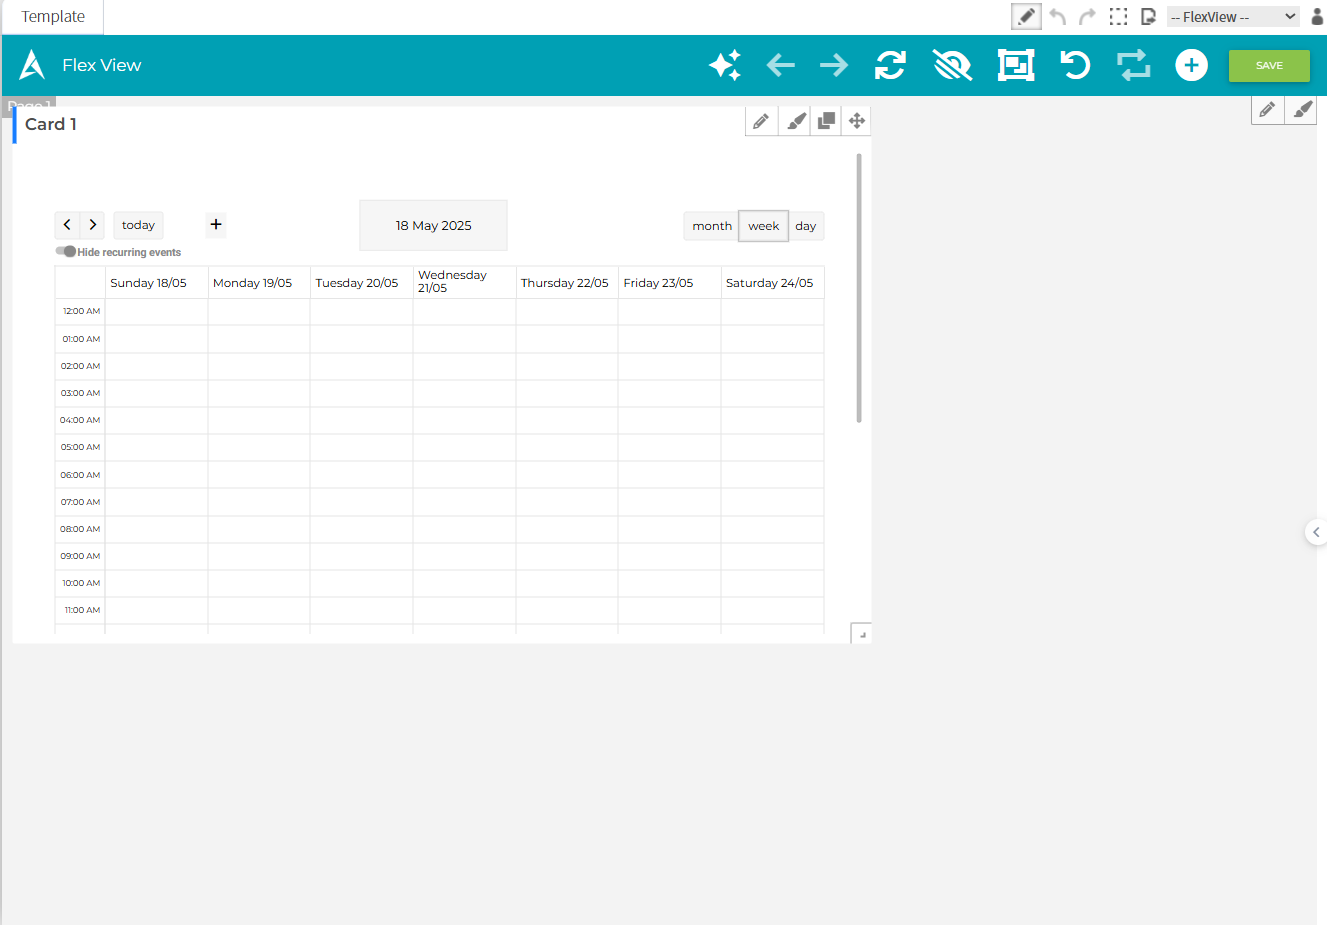
🗂️ EnhancedScheduler Card
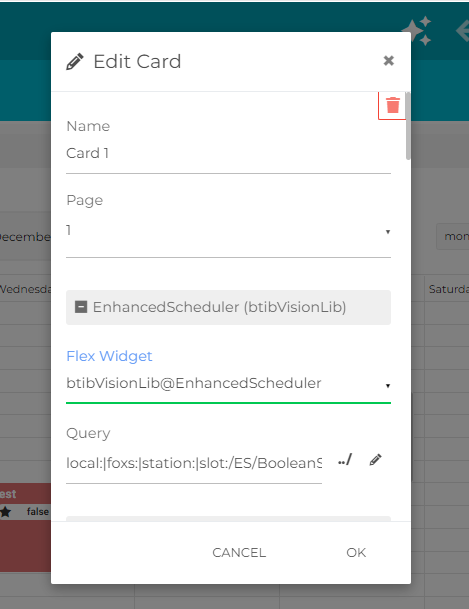
🧩 Import the Flex Widget
To use the EnhancedScheduler card, you need to import the widget from the btibVisionLib module:
btibVisionLib@EnhancedScheduler
🔗 Set the Query
Once the widget is imported, provide a valid query path pointing to an EnhancedScheduler view (typically a component of type Schedule) in your station.
This allows the card to render the calendar and display all associated events.
✨ Color Customization in PX View
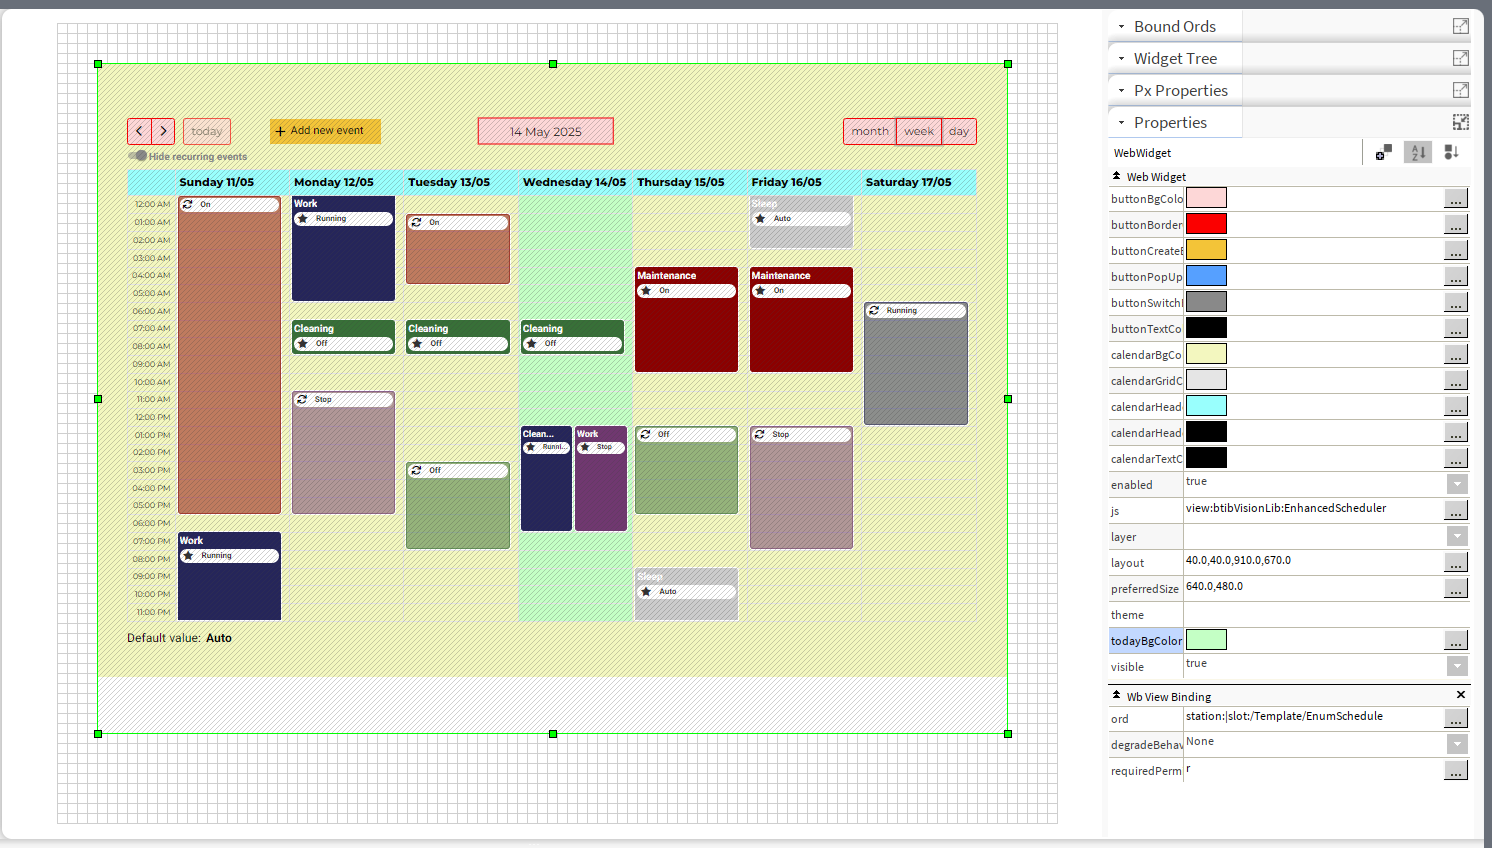
Customizing colors in a PX view.
-
Access the PX View:
-
Open the PX View where the EnhancedScheduler is implemented.
-
-
Properties Panel:
-
Locate the Properties Panel on the right-hand side.
-
Adjust the same color properties listed above to customize the card directly in the PX interface.
-
This provides even greater flexibility to tailor the look and feel of your EnhancedScheduler card.
🔍 Flexible Navigation
Viewing and Browsing
The EnhancedScheduler offers various views to assist users in efficiently managing their calendar:
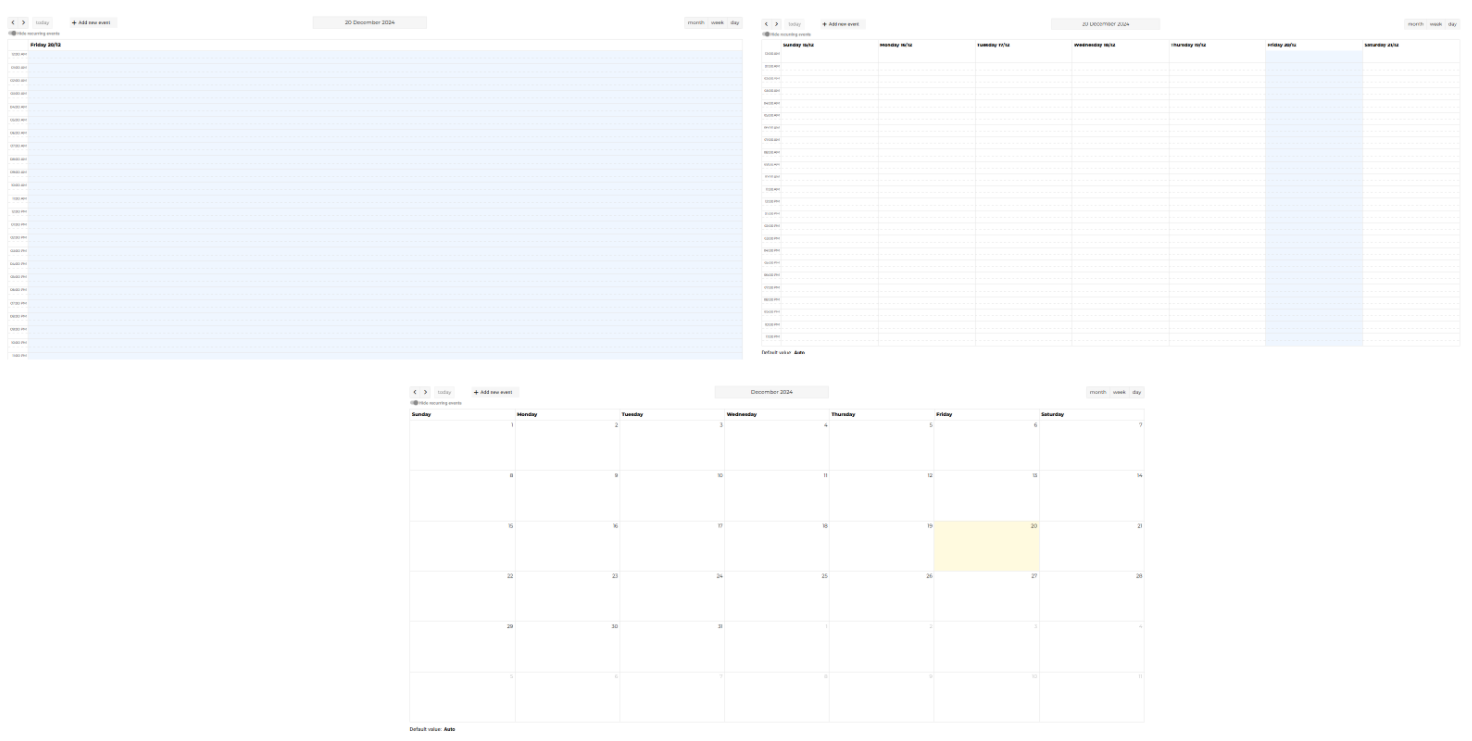
📆 Multiple Calendar Views
-
Monthly View: Provides a comprehensive overview of all events for the month, ideal for long-term planning and tracking.
-
Weekly View: Offers a detailed breakdown of events for the week, perfect for managing weekly schedules and avoiding overlaps.
-
Daily View: Focuses on a single day's events, offering a clear and precise schedule for daily activities.
🧭 Intuitive Navigation Tools
The EnhancedScheduler view includes simple and efficient tools to navigate the calendar:
-
Quick navigation: Switch between day, week, or month views using dedicated buttons.
-
Date picker: Jump directly to a specific date.
-
Today button: Instantly return to the current day.
🖥️ Toggle Recurring Events
EnhancedScheduler includes a toggle button that allows users to easily show or hide recurring events. This feature helps in decluttering the calendar view and focusing on special or one-time events as needed.
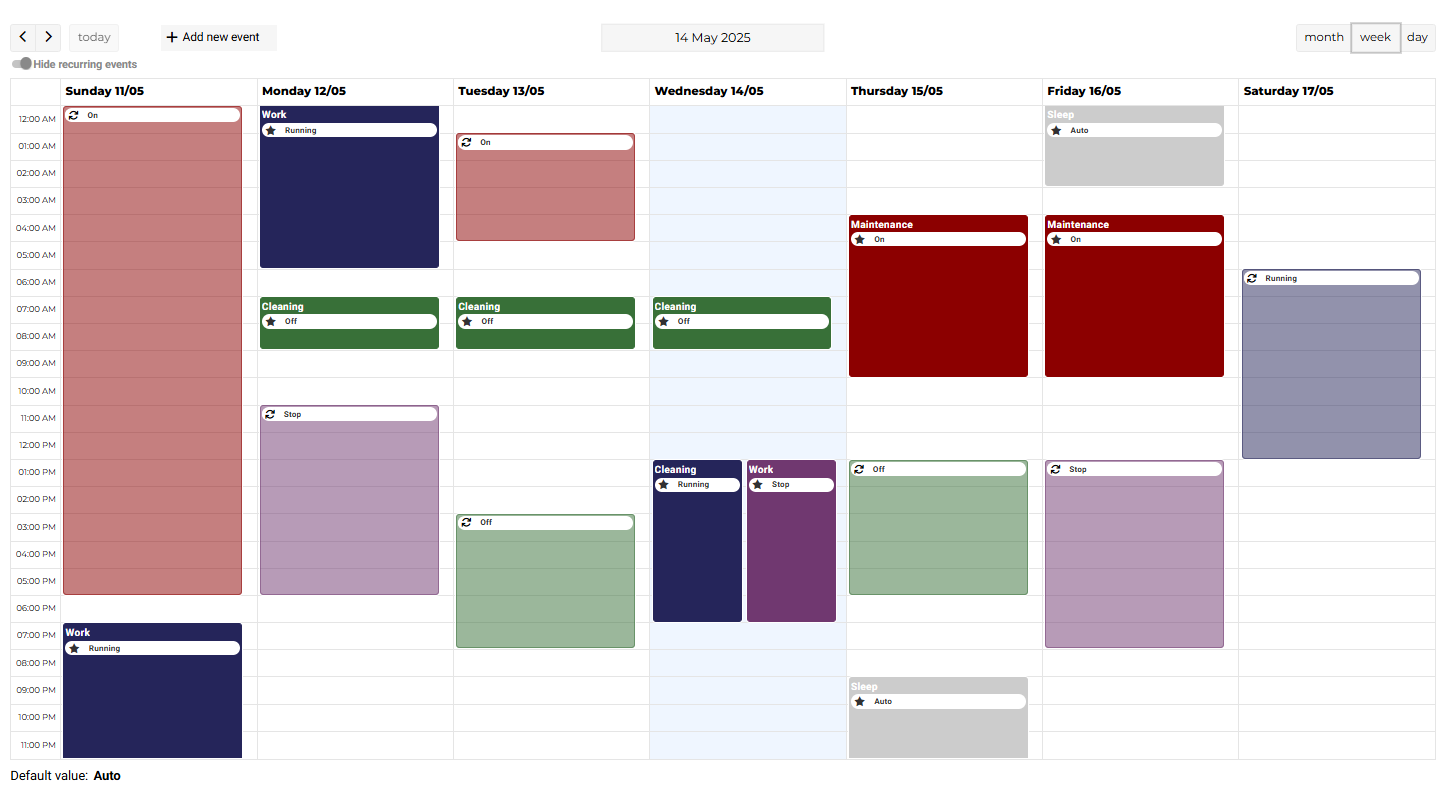
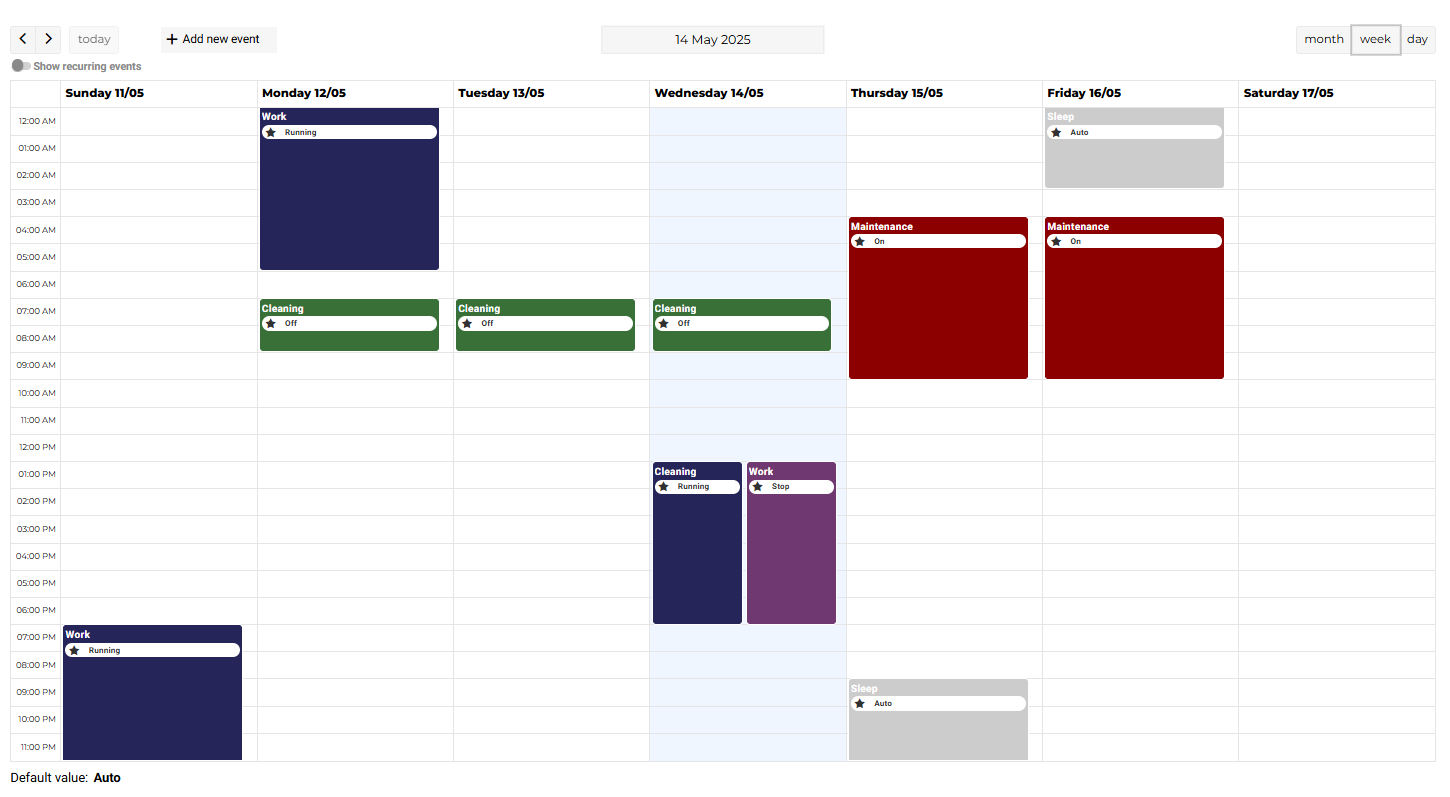
Example
Below is an example of the calendar view before and after using the toggle button to hide recurring events.
|
Before Using Toggle Button |
After Using Toggle Button |
|---|---|
|
|
|
-
Before: In this state, all events, including recurring events, are visible. This can sometimes make the calendar look cluttered if there are many recurring events.
-
After: In this state, recurring events are hidden, allowing users to focus on special or one-time events. This makes the calendar cleaner and easier to navigate.

⚙️ Configuration
Before using the EnhancedScheduler, you can customize its settings via the AX Property StyleSheet. The EnhancedScheduler supports the following facets:
|
Key |
Type |
Description |
|---|---|---|
|
trueText |
String |
Text displayed for a true value. |
|
falseText |
String |
Text displayed for a false value. |
|
range |
EnumRange |
Acceptable range of enumerated values. |
|
units |
Unit |
Unit of measurement associated with the value. |
|
min |
Float |
Minimum allowed value. |
|
max |
Float |
Maximum allowed value. |
|
precision |
Integer |
Number of decimal places for the value's precision. |
How to Configure:
-
Access the AX Property StyleSheet in your environment.
-
Modify the values according to your specific needs:
-
trueText / falseText: Specify the texts displayed for boolean values.
-
range: Define the possible value ranges through enumerations.
-
units: Choose the appropriate unit for your measurements.
-
min / max: Adjust the minimum and maximum values to restrict the acceptable range.
-
precision: Set the level of precision for numerical values.
-
This configuration allows you to tailor the EnhancedScheduler's display and behavior to better meet your operational requirements.
Language Adaptation in EnhancedScheduler
The EnhancedScheduler view adapts to the user's language settings, providing a seamless and localized experience. Here are some key features that change based on the selected language:
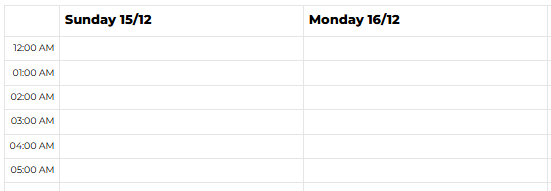
📅 First Day of the Week
-
French (fr): The first day of the week is Monday.
-
English (en): The first day of the week is Sunday.
This helps users to better organize and plan their events according to their regional preferences.
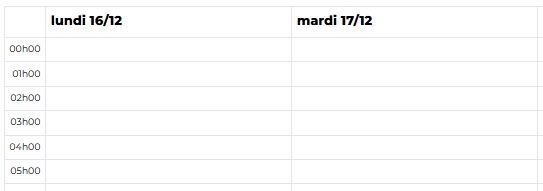
🕒 Time Format
-
French (fr): Time is displayed in 24-hour format.
-
English (en): Time is displayed in AM/PM format.
The time format adapts automatically, ensuring that users can easily read and interpret event times according to their familiar conventions.
By adapting to the user's language settings, the EnhancedScheduler ensures that event management is intuitive and aligned with regional preferences, enhancing the overall user experience.
🛠️ Changing the User's Date Format
To change the date format for a user in the EnhancedScheduler, follow these steps:
-
Navigate to User Settings:
-
Go to Services > UserService > YourUser.
-
-
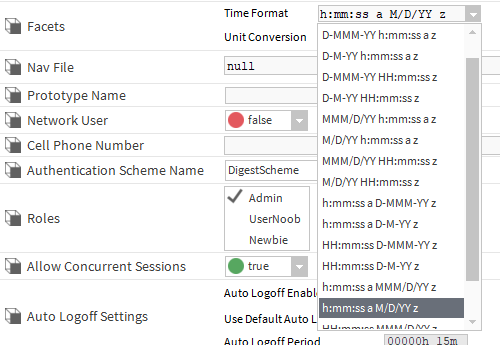
Select the Time Format:
-
In the Facets section, you can select a Time Format that suits your preference.
-
Important Note:
-
The selected time format will be applied, but only the hours and minutes will be displayed in the EnhancedScheduler view for better readability.
Restart Required:
-
After changing the Time Format in the UserService, you must restart your WorkBench for the changes to take effect.
By following these steps, you can customize the date format according to your preferences, ensuring that the EnhancedScheduler displays time in a format that you find most convenient.
📊 Comparison: Niagara Schedule View vs. EnhancedScheduler
|
Feature / Capability |
Niagara Schedule View |
EnhancedScheduler View |
|---|---|---|
|
Unified view for recurring & special events |
❌ |
✅ |
|
Recurring events |
✅ |
✅ |
|
Special events |
✅ |
✅ |
|
Reference events |
✅ |
✅ |
|
MultiDays events |
❌ |
✅ |
|
Event creation by click/drag |
❌ |
✅ |
|
Create events with same name |
❌ |
✅ |
|
Priority management |
✅ |
✅ |
|
Toggle show/hide recurring events |
❌ |
✅ |
|
Navigation by view (Day/Week/Month) |
❌ |
✅ |
|
Edit events (resize) |
❌ |
✅ |
|
Edit events (drag & drop) |
❌ |
✅ |
|
Multiple time windows per event |
❌ |
✅ |
|
Color customization in PX View |
❌ |
✅ |
|
Cleanup of expired events |
✅ |
✅ |
|
Use in a FlexView Card |
❌ |
✅ |
|
|
|
|
✅ = Feature supported
❌ = Feature not available or limited