
Make sure before to follow Initial step Configure your NiagaraNetworks. This is where you configure the Niagara Stations and their respective role.
Hierarchy configuration
Presentation
In the target station, the propagation only affects the Nodes: NO ASPECT OR NODE DEFINITION WILL BE CREATED, UPDATED OR DELETED. To be able to propagate a Node from a source station to a target station, the target station must have the same parent Node Definition and the same parent Aspect.
Example
Let's say that we want to propagate the "Ground Floor" Node from the source station (Supervisor).
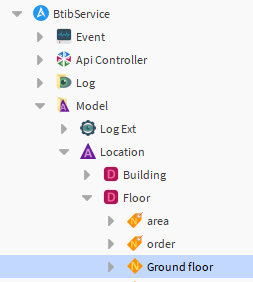
The target station (Jace1) MUST have the "Location" Aspect and the "Ground Floor" Node Definition.
Now that your stations have matching hierarchies, let's move on to the Aspects.
Aspect Configuration
Presentation
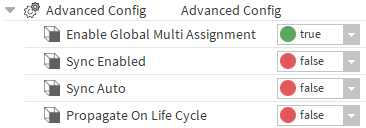
There are dedicated slots in the Aspects' Advanced Configuration dedicated to the configuration of the propagation
These slots were implemented and used in previous versions.
They are not used currently, but will be implemented soon.
Feel free to skip this part
Depending on your Aspect's propagation configuration, your Model Items will propagate on different conditions:
-
SyncEnabled: The most important slot when it comes to propagation. If it's disabled, no propagation will be possible. If it's enabled, propagation will be possible through the "Synchronize" action, available in the Aspects, Node Definitions and Nodes.
-
SyncAuto: Triggers the propagation when Nodes are created or modified. To enable it, SyncEnabled must be set to true.
-
PropagateOnLifeCycle: Trigger the propagation of Life Cycle Action i.e. the "Initialize", "Clean" and "Disable" actions. To enable it, SyncEnabled must be set to true.
By default, syncEnabled, syncAuto and PropagateOnLifeCycle are set to false.
Each of those settings in the source station will allow different triggers with different results in the target station, see Step 3 Configure the model propagation triggers for more information.
Example
For simplicity's sake, we will focus on the propagation through the "Synchronize" action.
To put it in a nutshell, the "Synchronize" action will duplicate the source Node in the target station, it will either:
-
create a copy if it doesn't already exist
-
update the slots values in the already existing target Node.
In our case, let's focus on the propagation of the Nodes in the Location Aspect, from the Supervisor to Jace1. We only need to set SyncEnabled to true
Only the source station must have SyncEnabled set to true, no checks are made on the target station
Node Definition Configuration
Presentation
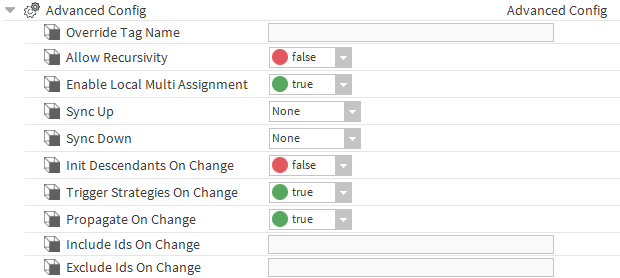
There are dedicated slots in the Node Definitions' advanced configuration.
Depending on your Node Definition's propagation configuration, your Model Items will propagate to different stations:
-
SyncUp: Determine if the Model Items will propagate to the stations with the SUPERVISOR role.
-
SyncDown: Determine if the Model Items will propagate to the stations with the SUBORDINATE role.
There are three possible values:
-
None: the Model Items won't be propagated
-
Full: the Model Items will be propagated. Setting the value to Full and updating the view will display two new slots:

-
Restricted: Setting the value to Restricted and updating the view will display a new slot (in addition to the two previous ones):

-
-
Info Predicate: Display the available variables for the predicate
-
Sync XXX Predicate: The predicate that will determine whether the Model Item will be propagated or not.
-
By default, SyncUp and SyncDown are set to None.
You CANNOT propagate Model Items between two PEER stations.
Example
In our case, let's say that we want to propagate Nodes in the "Building" Node Definition, from the Supervisor to Jace1.
Jace1 is a SUBORDINATE, so in the Supervisor's Building Node Definition, we will set the SyncDown to Full.
ModelDeviceExt Configuration
Presentation
The ModelDeviceExt (absent by default) will be located in the target NiagaraStation in the NiagaraNetwork. It will be named ModelDeviceExt (you might need to refresh the tree to have the capitalized displayName).
It doesn't exist by default.
You can add it using the "Initialize Propagation" Action in the "Propagation" Folder located in the BtibService.
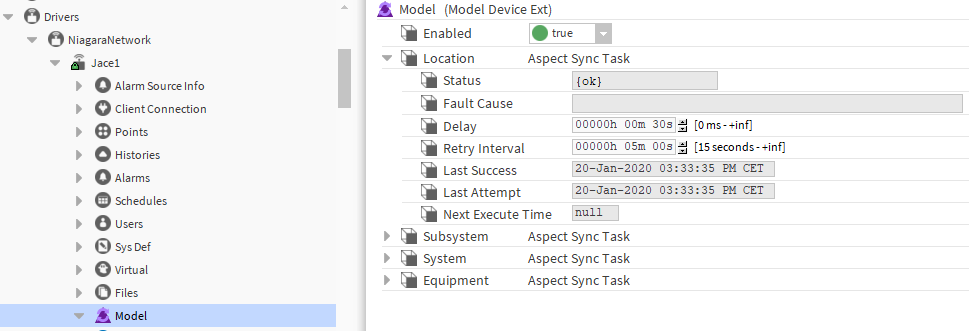
The ModelDeviceExt is a component which contains different synchronization tasks.
It contains AspectSyncTasks focused on a single Aspect. The AspectSyncTasks are added by triggering the "Initialize Propagation" action in the "Propagation" Folder located in the BtibService.
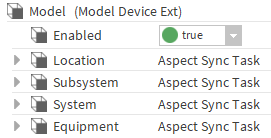
The configuration is pretty straightforward, a ModelDeviceExt can either be enabled or not, allowing you to totally stop propagations toward a specific station.
Example
As said before, we will propagate the "Ground Floor" Node, located in Location/Floor.
We need the ModelDeviceExt in both stations in the NiagaraNetwork with the AspectSyncTask associated to the Location Aspect.
To create them the, trigger the "Initialize Propagation" action in the "Propagation" Folder located in the BtibService in both stations.
Next Step
Step 2 Launch a model propagation